
Hi Guys,

Welcome in the month of december!
...and what's better than finishing this year learning how to install SQL Server 2019 for linux
Today i will show you how to do it from zero and step by step! Starting from installing Vmplayer, Ubuntu e finally SQL Server.
It is a sort of part one becuase i do it in order to do some test on SQL Server for Linux.
Are you ready for this 0 to SQL Server for linux?? Let's go!
Installing VMware player
First of all we need to download a virtualization software. I use VMware workstation player because i powerfull and easy to use. Here you can find offers
The player version is free and you can download the last version (16.2.1) here
Just do a double click on the exe file:

Press the Next button:

Then accept the terms in the Licence Agreement and press Next:

Now change the path in case using the change button and press the Next button

Press Next button:

Press Next button again:

Since I have a previous version the caption of the button is "Upgrade" instead of "Install":
Press the button:

the installation (or update) begins:

After one of two minutes (on my notebook) the installation ends

One last reboot:

let's run the VM player!
Choose the free version for a non-commercial use (or enter the licence..)

Et voilà ... press finish!

You are ready to use you virtualization software.
Now you can install your favorite OS on it
Now, we will install the linux based ubuntu distribuition.
Installing Ubuntu 20.04 Lts
Fist of all we will install the 20.04 version of Ubuntu because the latest one (21.10) does not support SQL Server 2019.
First of all download the image of ubuntu:

Then start the VM player and from the File menu choose the New Virtual Machine item

The installation is really simple also because VMware recognizes the operating system it contains from the image.
Now choose the "Installer disc image file (iso)" item, click on the Browse button and go to get the downloaded iso file.

Note the label that says that the operative system (OS) has been detected.
In this case the installation procedure is simplified!
Just enter, in addition to the description of the machine, Username and Password:
Super Easy!

Here you can choose the location of the virtual machine. Just click on the Browse button to change the default value:

By default a size of 20 GB are allocated for the VM. You can change this value.

Here a summary of infos.
Click on the Customize Hardware of modify the configuration.
You can set number of processors, quantity of RAM and many other parameters:

At the end our VM will be started.

Again super easy!
And now the SQL Server 2019 for linux installation! Let's go!
Installing SQL Server 2019 for Linux
Also in this case the installation steps are few and you will see, simple.
what you need to know about linux to install programs? well, actually a little
Open the terminal and write commands from the command line (like in the old days of microsoft DOS)
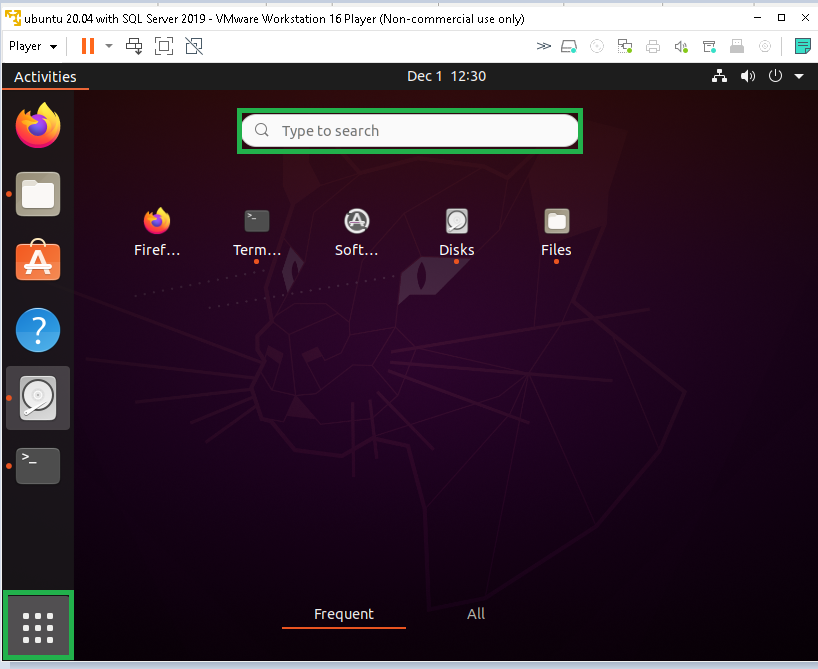
To open the terminal just press the button at the bottom left.
Then write inside the green box what are you looking for. So type "Terminal"
Now type the first command
wget -qO- https://packages.microsoft.com/keys/microsoft.asc | sudo apt-key add -
The password of the super user will be asked.
If everything is correct, OK will be returned

then type this command to download SQL Server 2019:
sudo add-apt-repository "$(wget -qO- https://packages.microsoft.com/config/ubuntu/20.04/mssql-server-2019.list)"

then type:
sudo apt-get update

then type this command in orderto install SQL Server
sudo apt-get install -y mssql-server

Now SQL Server is installed.
Esecute the following command for execute the configuration:
sudo /opt/mssql/bin/mssql-conf setup
You can choose wich version use ( I suggest the free developer edition ) and you need to set a password:

SQL server 2019 is now ready to work.
Just type the command below to test if the service is running
systemctl status mssql-server --no-pager

yes... the green label "active" tells us that SQL Server is running
What are we missing now?
Well since there is no management studio (SSMS) for linux, at least the command line toos must be installed to interact with SQL Server.
The next post we will see how to install it but above all we will do a benchmark and a comparison between SQL Server on windows and on Linux!
Who will be the fastest?
That's all for this midweek post! Stay tuned for the next one!
Luca

Affiliated with VMWARE take a look to the special offers
Next post:
Previous post: SQL Server, how to improve privacy (and be more gdpr complaiant) at no cost with the "dynamic data masking" feature